
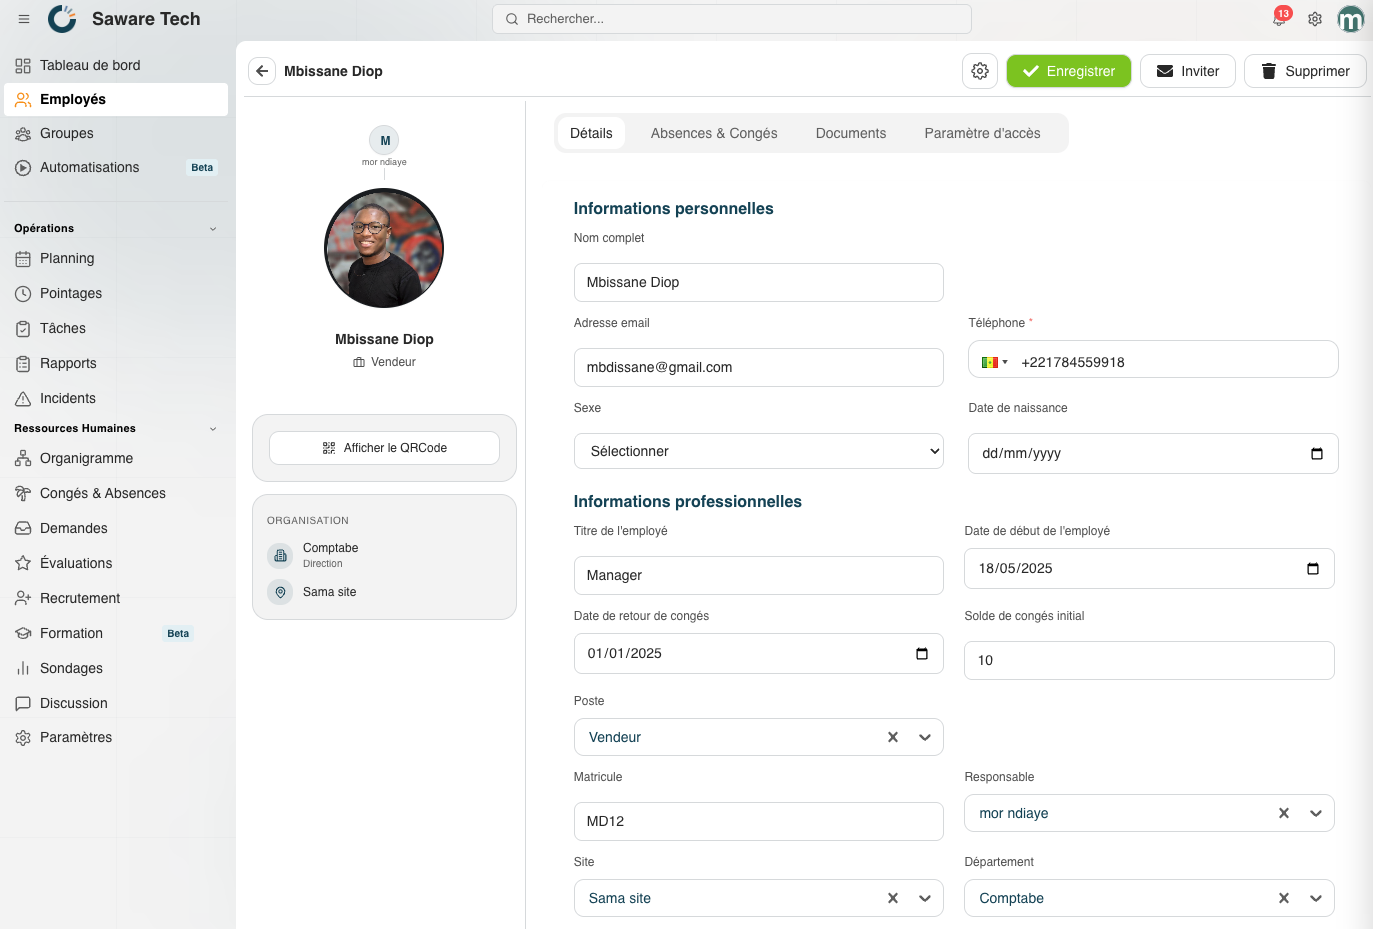
Accessing the Employees Module
- From the dashboard, open the Employees menu
- Click on Add Employee
- Fill in the employee information
- Click Save
Personal Information
Full Name (*)
Used to identify the employee across the entire platform: schedules, attendance tracking, reports, evaluations, and documents.
Email Address
Used to:
- send invitations,
- receive notifications,
- access the Weplanify web platform,
- reset passwords,
- and manage internal communications.
Phone Number (*)
Allows the employee to log into the Weplanify mobile application and may also be used to contact the employee directly.
Gender
Informational field used for HR management and administrative reporting.
Date of Birth
Used for employee administration and may be useful for HR records, insurance, or reporting purposes.
Professional Information
Employee Title
Represents the employee’s general role or function within the company.
Examples:
- Manager
- Supervisor
- Field Agent
Employee Start Date
Official employee joining date.
Used for:
- seniority calculation,
- leave management,
- and HR reporting.
Leave Return Date
Defines the expected return date after leave or extended absence.
Initial Leave Balance
Number of leave days available when creating the employee profile.
Position
Defines the employee’s job or work category.
Examples:
- Salesperson
- Cashier
- Security Guard
Employee ID / Registration Number
Unique internal code used to identify the employee within the company.
Manager
Assigns a direct supervisor or reporting manager to the employee.
Site
Defines the employee’s primary work location.
Examples:
- Dakar Branch
- Plateau Site
- Warehouse
Department
Links the employee to a specific department or business unit.
Examples:
- Accounting
- Human Resources
- Operations
Details Tab / Operational Settings
Site Position
Defines the employee’s specific operational role on a given site.
Contract Type
Defines the employee’s contract category.
Examples:
- Permanent Contract
- Fixed-Term Contract
- Internship
- Contractor
Attendance Information
Attendance Type
Defines the method used to record attendance.
Examples:
- QR Code
- Badge
- Geolocation
- Manual
Attendance Code
Unique code used by the employee for clock-in and clock-out operations.
Enable Attendance
Enables or disables attendance tracking for this employee.
Hide in Schedule
Prevents the employee from appearing in schedule views.
Work Schedule
Start Time
Regular shift start time.
End Time
Regular shift end time.
Default Break
Break duration automatically deducted from working hours.
Default Rest Days
Defines the employee’s weekly rest days.
Public Holidays = Paid Rest Days
Defines whether public holidays are automatically considered paid rest days.
Overtime Tracking
Enables overtime tracking and calculation.
Multiple Check-ins Per Day
Allows multiple clock-ins and clock-outs within the same day.
Recurring Schedule
Automatically generates recurring schedules based on the configured working hours.
Add Attendance Locations
Allows administrators to restrict or authorize the locations where the employee can clock in.
Other Tabs
Absences & Leave
Manage leave requests, absences, supporting documents, and leave history.
Documents
Store administrative documents such as:
- contracts,
- ID cards,
- resumes,
- certificates,
- and other HR files.
Access Settings
Manage user roles and platform permissions.
Une fois ajouté, l’employé pourra apparaître dans les plannings, les pointages, les évaluations et les workflows selon les modules activés.