
DocumentationForms & requests
Weplanify forms: requests, reports and surveys
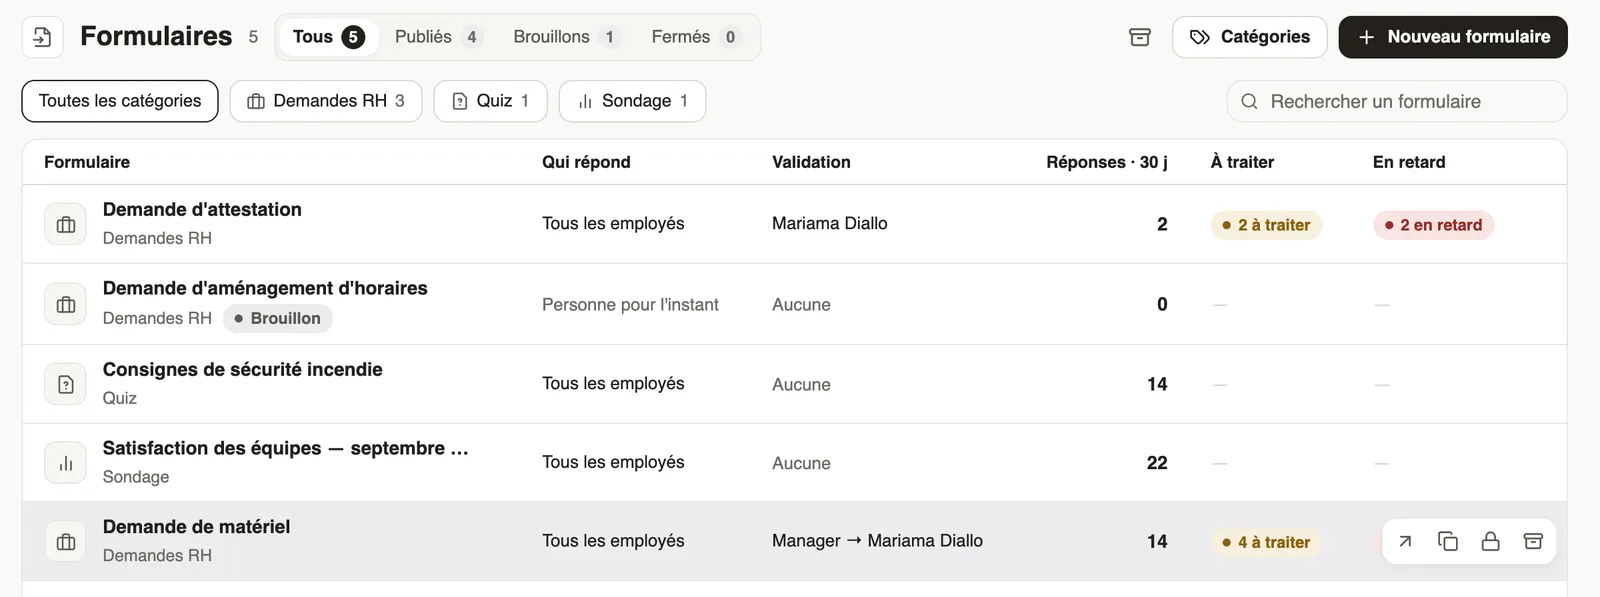
In Weplanify, every company form sits in a single list, sorted by category, showing what is waiting for your decision and what is running late.
In Weplanify, a form is a list of questions: a request to approve, a field report, a checklist or a survey. They are all in Requests → Forms, in a single list.
Steps
- Open Requests → Forms. Filter with the category pills (HR requests, Quizzes, Surveys…), with the All, Published, Drafts, Closed tabs, or search by name.
- Read each row: Who answers, Approval (who approves), Answers · 30 d, To review (answers waiting for your decision) and Late (those waiting beyond their step's deadline).
- Click the "to review" or "late" pill to open those answers directly, or click the row to open the form.
- Hover a row to Open, Duplicate, Close (or Reopen) and Archive.
- To create one: New form.
Good to know
- The Requests menu also holds To handle, Make a request, My requests and Recruitment.
- The former Reports, Incidents, Evaluations, Training, HR requests and Surveys modules are now categories: their old addresses open the filtered list.
- Duplicate creates a draft copy. The archive icon, next to Categories, shows archived forms, with Restore.
- Built-in forms (expense claims, advances, planning requests) are not in this list: expense claims are set up in the expense types.
Go further
Sort forms into categoriesIn Weplanify, categories sort your forms: their icon, their sentence, who sees them and their order in the employees' Make a request screen.Create a form and add its questionsIn Weplanify, create a form from your need and a ready-made template, then adjust its questions while the phone preview shows what employees see.Receive employees' HR requestsIn Weplanify, HR requests is a category of forms (equipment, certificate, working hours) that employees find in their Make a request screen.Make a request: leave, expense, advance or formIn Weplanify, the Make a request screen brings leave, expense claims, advances and forms together: find what you need and send your request.Follow your requests: correct, remind, cancelIn Weplanify, My requests shows where each of your requests stands and who holds it: correct it, remind the approver or cancel it when needed.Publish a form and let employees knowIn Weplanify, publish a form and let people know: notification, New card on the home screen, poster; then close it or reopen it whenever needed.Recruit: job offers and candidate trackingIn Weplanify, publish a job offer, share its application link and move each candidate forward, from their application to their employee record.Follow, approve and export a form's responsesIn Weplanify, a form's Responses tab sorts answers by status, opens each one on the side so you can decide, and exports everything to Excel.Run a survey or an evaluation with your employeesIn Weplanify, run a satisfaction survey or an evaluation with your teams, without any approval step, and read the results question by question.Approve, refuse or send a request back for changesIn Weplanify, open a request waiting for you, discuss it if needed, then approve it, refuse it or ask its author to change it before deciding again.Create an expense typeIn Weplanify, an expense type (fuel, meals, road tolls) decides who pays, how the amount is computed, what must be attached and who approves it.An employee's dashboardIn Weplanify, an employee invited to the web sees their own dashboard: their leave balance, their next absence and the follow-up of this year's requests.